Having previously been disappointed by the information available on the topic, this is my attempt at categorizing different ways to implement 2D platform games, list their strengths and weaknesses, and discuss some implementation details.
The long-term goal is to make this an exhaustive and comprehensible guide to the implementation of 2D platform games. If you have any sort of feedback, correction, request, or addition – please leave it in the comments!
Disclaimer: some of the information presented here comes from reverse engineering the behavior of the game, not from its code or programmers. It’s possible that they are not ACTUALLY implemented in this way, and merely behave in an equivalent way. Also note that tile sizes are for the game logic, graphical tiles might be of a different size.
Four Ways of Implementing
I can think of four major ways in which a platform game can be implemented. From simplest to most complicated, they are:
Type #1: Tile-based (pure)
Character movement is limited to tiles, so you can never stand halfway between two tiles. Animations may be used to create the illusion of smooth movement, but as far as the game logic is concerned, the player is always right on top of a specific tile. This is the easiest way to implement a platform game, but it imposes heavy restrictions on the control of character, making it unsuitable for traditional action-based platformers. It is, however, popular with puzzle and “cinematographic” platformers.
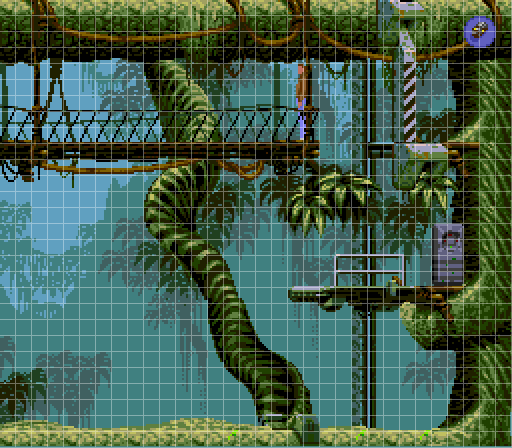 Flashback, shown with tile boundaries
Examples: Prince of Persia, Toki Tori, Lode Runner, Flashback
How it works
The map is a grid of tiles, each one storing information such as whether it’s an obstacle or not, what image to use, what kind of footstep sound to use, and so on. The player and other characters are represented by a set of one or more tiles that move together. In Lode Runner, for example, the player is a single tile. In Toki Tori, the player is 2×2 tiles. In Flashback, which is unusual due to the smaller size of its tiles, the player is two tiles wide and five tiles tall (see image above) when standing, but only three tiles tall when crouching.
In this kind of game, the player will rarely – if ever – be moving diagonally, but, if he is, the movement can be decomposed in two separate steps. Likewise, he will likely only move one tile at once, but multi-tile movement can be done as multiple steps of one tile, if needed (in Flashback, you always move two tiles at once). The algorithm is then as follows:
- Create a copy of the character where he’d like to move to (e.g., if moving one tile to the right, make a copy where every tile of the character is shifted 1 tile to the right)
- Check that copy for intersection with the background and other characters.
- If an intersection is found, the character’s movement is blocked. React accordingly.
- Otherwise, the path is clear. Move character there, optionally playing an animation so the transition looks smooth.
This kind of movement is very ill-suited for traditional arc-shaped jumps – so games in this genre often have no jump at all (Toki Tori, Lode Runner), or only allow vertical or horizontal jumps (Prince of Persia, Flashback), which are nothing but special cases of linear movement.
Advantages of this system include simplicity and precision. Since the games are more deterministic, glitches are much less likely, and the gameplay experience is more controlled, with less of a need to tweak values depending on circumstances. Implementing certain mechanics (such as grabbing ledges and one-way platforms) becomes a breeze, compared to more complex movement styles – all you have to do is check whether the player tiles and the background tiles are aligned in the one specific way that allows for a given action.
In principle, this system doesn’t allow steps of less than one tile, but that can be mitigated in a few different ways. For example, the tiles can be a bit smaller than the player (say, a player is 2×6 tiles), or you can allow a visual-only movement to take place inside a given tile, without affecting the logic (which is the solution that I believe that “Lode Runner – The Legend Returns” takes).
Type #2: Tile Based (Smooth)
Collision is still determined by a tilemap, but characters can move freely around the world (typically with 1px resolution, aligned to integers, but see the note at the end of article regarding smoothing of movement). This is the most common form of implementing platformers in 8-bit and 16-bit consoles, and remains popular today, as it is still easy to implement and makes level editing simpler than more sophisticated techniques. It also allows for slopes and smooth jump arcs.
If you’re unsure which type of platformer you want to implement, and you want to do an action game, I suggest going for this one. It’s very flexible, relatively easy to implement, and gives you the most control of all four types. It’s no wonder that the majority of the best action platformers of all time are based on this type.
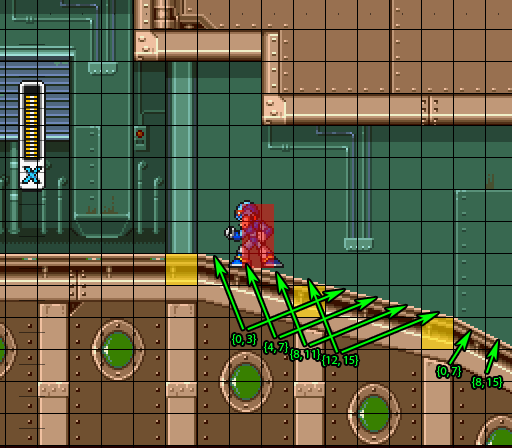
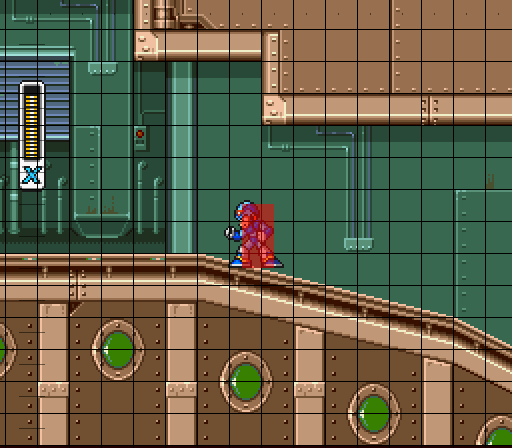 Mega Man X, shown with tile boundaries and player hitbox.
Examples: Super Mario World, Sonic the Hedgehog, Mega Man, Super Metroid, Contra, Metal Slug, and practically every platformer of the 16-bit era
How it works
Map information is stored in the same way as with the pure tile technique, the difference is merely in how the characters interact with the background. The character’s collision hitbox is now an Axis-Aligned Bounding Box (AABB, that is, a rectangle that cannot be rotated), and are typically still an integer multiple of tile size. Common sizes include one tile wide and one (small Mario, morph ball Samus), two (big Mario, Mega Man, crouched Samus) or three (standing Samus) tiles tall. In many cases, the character sprite itself is larger than the logical hitbox, as this makes for a more pleasant visual experience and fairer gameplay (it’s better for the player to avoid getting hit when he should have than for him to get hit when he should not have). In the image above, you can see that the sprite for X is square-ish (in fact, is two tiles wide), but his hitbox is rectangular (one tile wide).
Assuming that there are no slopes and one-way platforms, the algorithm is straightforward:
- Decompose movement into X and Y axes, step one at a time. If you’re planning on implementing slopes afterwards, step X first, then Y. Otherwise, the order shouldn’t matter much. Then, for each axis:
- Get the coordinate of the forward-facing edge, e.g. : If walking left, the x coordinate of left of bounding box. If walking right, x coordinate of right side. If up, y coordinate of top, etc.
- Figure which lines of tiles the bounding box intersects with – this will give you a minimum and maximum tile value on the OPPOSITE axis. For example, if we’re walking left, perhaps the player intersects with horizontal rows 32, 33 and 34 (that is, tiles with y = 32 * TS, y = 33 * TS, and y = 34 * TS, where TS = tile size).
- Scan along those lines of tiles and towards the direction of movement until you find the closest static obstacle. Then loop through every moving obstacle, and determine which is the closest obstacle that is actually on your path.
- The total movement of the player along that direction is then the minimum between the distance to closest obstacle, and the amount that you wanted to move in the first place.
- Move player to the new position. With this new position, step the other coordinate, if still not done.
Slopes
Slopes (the tiles pointed by green arrows on the image above) can be very tricky, because they are obstacles, and yet still allow the character to move into their tile. They also cause movement along the X axis to adjust position on the Y axis. One way to deal with them is to have the tile store the “floor y” of either side. Assuming a coordinate system where (0, 0) is at top-left, then the tile just left of X (first slope tile) is {0, 3} (left, right), then the one he stands on is {4, 7}, then {8, 11}, then {12, 15}. After that, the tiles repeat, with another {0, 3}, etc, and then we have a steeper slope, composed of two tiles: {0, 7} and {8, 15}.
The system that I’m going to describe allows arbitrary slopes, though for visual reasons, those two slopes are the most common, and result in a total of 12 tiles (the 6 described previously, and their mirrorings). The collision algorithm changes as follows for horizontal movement:
- Make sure that you step X position before Y position.
- During collision detection (4 above), the slope only counts as a collision if its closest edge is the taller (smaller y coordinate) one. This will prevent characters from “popping” through the slope from the opposite side.
- You might want to forbid slopes to stop “halfway through” (e.g. on a {4, 7} tile). This restriction is adopted by Mega Man X and many other games. If you don’t, you have to deal with the more complicated case of the player attempting to climb from the lower side of the slope tile – one way to deal with this is to pre-process the level, and flag all such offending tiles. Then, on collision detection, also count it as a collision from the lower side if the player’s lowest y coordinate is greater (that is, below) the tile’s offset edge (tile coord * tile size + floor y).
- A full obstacle tile adjacent to the slope the character is currently on should not be considered for collision if it connects to the slope, that is, if the character (that is, his bottom-center pixel) is on a {0, *} slope, ignore left tile, and, if on a {*, 0} slope, ignore the right tile. You may have to do this for more tiles if your character is wider than two tiles – you might simply skip checking on the entire row if the player is moving towards the upper side of slope. The reason for this is to prevent the character from getting stuck at those tiles (highlighted yellow above) while still climbing the slope, as his foot will still be below the “surface level” by the time he comes into contact with the otherwise solid tile.
And for vertical movement:
- If you’re letting gravity do its job for downhill movement, make sure that the minimum gravity displacement is compatible with slope and horizontal velocity. For example, on a 4:1 slope (as {4, 7} above), the gravity displacement must be at least 1/4 of the horizontal velocity, rounded up. On a 2:1 slope (such as {0, 7}), at least 1/2. If you don’t ensure this, the player will move horizontally right off the ramp for a while, until gravity catches up and drags him down, making him bounce on the ramp, instead of smoothly descending it.
- An alternative to using gravity is to compute how many pixels above floor the player was before movement, and how many it is afterwards (using the formula below), and adjust his position so they’re the same.
- When moving down, instead of considering a slope tile’s top edge as its collision boundary, instead, compute its floor coordinate at the current vertical line, and use that. To do that, find the [0, 1] value which represents the player’s x position on tile (0 = left, 1 = right) and use it to linearly interpolate the floorY values. The code will look something like:Â
float t = float(centerX - tileX) / tileSize;
float floorY = (1-t) * leftFloorY + t * rightFloorY;
- When moving down, if multiple tiles on the same Y coordinate are obstacle candidates, and the one on the X coordinate of the player’s center is a slope tile, use that one, and ignore the rest – even though the others are technically closer. This ensures proper behaviour around the edges of slopes, with the character actually “sinking” on a completely solid tile because of the adjacent slope.
One-way platforms
One-way platforms are platforms that you can step on, but you can also jump through them. In other words, they count as an obstacle if you’re already on top of them, but are otherwise traversable. That sentence is the key to understanding their behavior. The algorithm changes as follows:
- On the x axis, the tile is never an obstacle
- On the y axis, the tile is only an obstacle if, prior to the movement, the player was entirely above it (that is, bottom-most coordinate of player was at least one pixel above top-most coordinate of one-way platform). To check for this, you will probably want to store the original player position before doing any stepping.
It might be tempting to have it act as an obstacle if the player’s y speed is positive (that is, if the player is falling), but this behavior is wrong: it’s possible for the player to jump so he overlaps the platform, but then falls down again without having his feet reach the platform. In that case, he should still fall through.
Some games allow the player to “jump down” from such platforms. There are a few ways to do this, but they are all relatively simple. You could, for example, disable one-way platforms for a single frame and ensure that y speed is at least one (so he’ll be clear of the initial collision condition on the next frame), or you could check if he’s standing exclusively on one-way platforms, and, if so, manually move the player one pixel to the bottom.
Ladders
 Mega Man 7, with tile boundaries, highlighted ladder tiles, and player ladder hitbox.
Ladders might seem complicated to implement, but they are simply an alternate state – when you’re in a ladder, you ignore most of the standard collision system, and replace it with a new set of rules. Ladders are typically one tile wide.
You can usually enter the ladder state in two ways:
- Have your character hitbox overlap with the ladder, either on ground or on air, and hit up (some games also allow you to hit down)
- Have your character stand on top of a “ladder top” tile (which is often a one-way platform tile as well, so you can walk on top of it), and hit down.
This has the effect of immediately snapping the player’s x coordinate to align with the ladder tiles, and, if going down from the top of ladder, move y coordinate so player is now inside the actual ladder. At this point, some games will use a different hitbox for the purposes of determining whether the player is still on the ladder. Mega Man, for example, seems to use a single tile (equivalent to top tile of the original character, highlighted in red in the image above).
There are a few different ways of LEAVING the ladder:
- Reaching the top of the ladder. This will usually prompt an animation and move the player several pixels up in y, so he’s now standing on top of the ladder.
- Reaching the bottom of a hanging ladder. This will cause the player to simply fall, although some games won’t let the player leave the ladder in this way.
- Moving left or right. If there is no obstacle on that side, the player may be allowed to leave that way.
- Jumping. Some games allow you to release the ladder by doing this.
Stairs
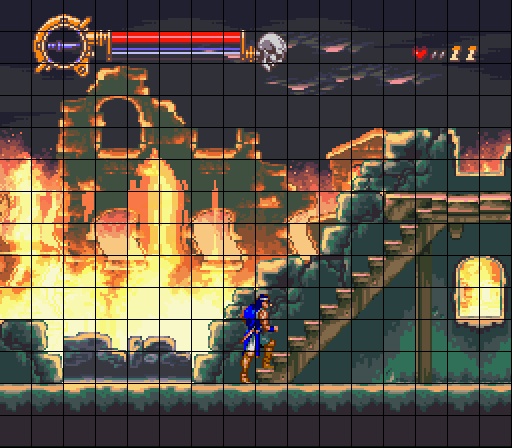 Castlevania: Dracula X, with tile boundaries
Stairs are a variation of ladders, seen in few games, but notably in the Castlevania series. The actual implementation is very similar to that of ladders, with a few exceptions:
- The player moves tile by tile or half-tile by half-tile (as in Dracula X)
- Each “step” causes the player to be shifted simultaneously on X and Y coordinates, by a preset amount.
- Initial overlapping detection when going up might look on the tile ahead instead of just the current overlap one.
Moving Platforms
Moving platforms can seem a little tricky, but are actually fairly simple. Unlike normal platforms, they cannot be represented by fixed tiles (for obvious reasons), and instead should be represented by an AABB, that is, a rectangle that cannot be rotated. It is a normal obstacle for all collision purposes, and if you stop here, you’ll have very slippery moving platforms (that is, they work as intended, except that the character does not move along it on his own).
There are a few different ways to implement that. One algorithm is as follows:
- Before anything on the scene is stepped, determine whether the character is standing on a moving platform. This can be done by checking, for example, whether his center-bottom pixel is just one pixel above the surface of the platform. If it is, store a handle to the platform and its current position inside the character.
- Step all moving platforms. Make sure that this happens before you step characters.
- For every character that’s standing on a moving platform, figure the delta-position of the platform, that is, how much it has moved along each axis. Now, shift the character by the same amount.
- Step the characters as usual.
Other Features
Other games have more complicated and exclusive features. Sonic the Hedgehog series is notable for this. Those are beyond the scope of this article (and my knowledge, for that matter!), but might be subject of a future article.
Type #3: Bitmask
Similar to “Tile Based (Smooth)”, but instead of using large tiles, an image is used to determine collision for each pixel. This allows finer detailing, but significantly increases complexity, memory usage, and requires something akin to an image editor to create levels. It also often implies that tiles won’t be used for visuals, and may therefore require large, individual artwork for each level. Due to those issues, this is a relatively uncommon technique, but can produce higher quality results than tile-based approaches. It is also suitable for dynamic environments – such as the destructible scenarios in Worms – as you can “draw” into the bitmask to change the scenario.
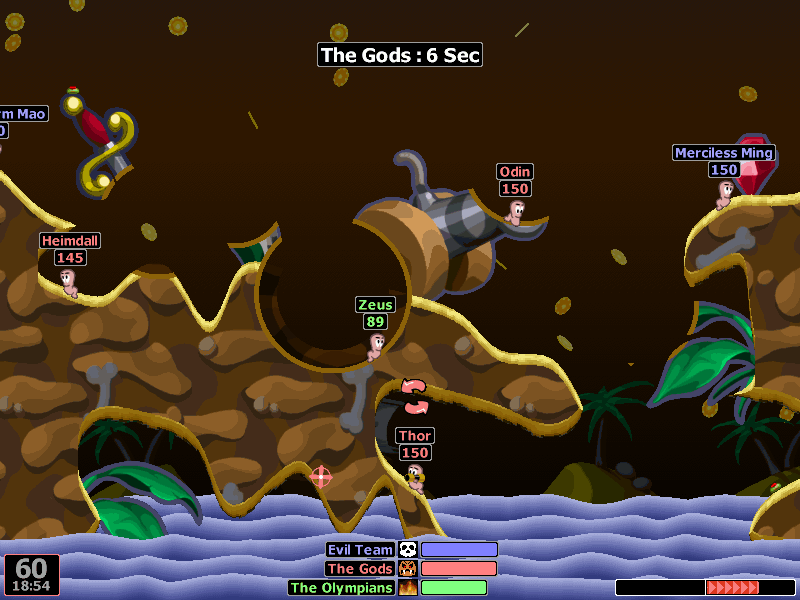 Worms World Party, featuring destructible terrain
Examples: Worms, Talbot’s Odyssey
How it works
The basic idea is very similar to the tile (smooth) algorithm – you can simply consider each pixel to be a tile, and implement the exact same algorithm, and everything will work, with one major exception – slopes. Since slopes are now implicitly defined by the positioning between nearby tiles, the previous technique doesn’t work, and a much more complex algorithm has to be used in its place. Other things, such as ladders, also become trickier.
Slopes
 Talbot’s Odyssey, with the collision bitmask overlaid on top of the game.
Slopes are the primary reason why this type of implementation is very hard to get right. Unfortunately, they are also pretty much mandatory, as it’d make no sense to use this implementation without slopes. Often, they’re the reason why you’re even using this system.
This is, roughly, the algorithm used by Talbot’s Odyssey:
- Integrate acceleration and velocity to compute the desired delta-position vector (how much to move in each axis).
- Step each axis separately, starting with the one with the largest absolute difference.
- For the horizontal movement, offset the player AABB by 3 pixels to the top, so he can climb slopes.
- Scan ahead, by checking against all valid obstacles and the bitmask itself, to determine how many pixels it is able to move before hitting an obstacle. Move to this new position.
- If this was horizontal movement, move as many pixels up as necessary (which should be up to 3) to make up for slope.
- If, at the end of the movement, any pixel of the character is overlaping with any obstacle, undo the movement on this axis.
- Regardless of result of last condition, proceed to do the same for the other axis.
Type #4: Vectorial
This technique uses vectorial data (lines or polygons) to determine the boundaries of collision areas. Very difficult to implement properly, it is nevertheless increasingly popular due to the ubiquity of physics engines, such as Box2D, which are suitable for implementing this technique. It provides benefits similar to the bitmask technique, but without major memory overhead, and using a very different way of editing levels.
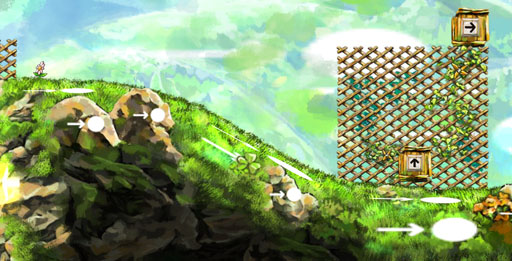
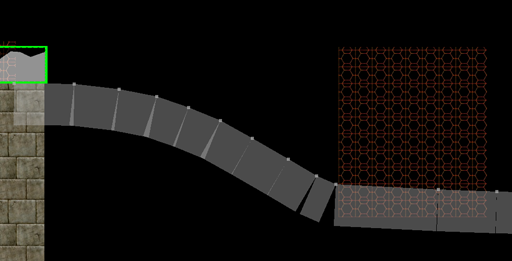 Braid (level editor), with visible layers (top) and the collision polygons (bottom)
Examples: Braid, Limbo
How it works
There are two general ways of approaching this:
- Resolve movement and collisions yourself, similar to the bitmask method, but using polygon angles to compute deflection and have proper slopes.
- Use a physics engine (e.g. Box2D)
Obviously, the second is more popular (though I suspect that Braid went for the first), both because it is easier and because it allows you to do many other things with physics in the game. Unfortunately, in my opinion, one has to be very careful when going this route, to avoid making the game feel like a generic, uninteresting physics-platformer.
Compound objects
This approach has its own unique problems. It may suddenly be difficult to tell whether the player is actually standing on the floor (due to rounding errors), or whether it’s hitting a wall or sliding down a steep incline. If using a physics engine, friction can be an issue, as you’ll want friction to be high on the foot, but low on the sides.
There are different ways to deal with those, but a popular solution is to divide the character into several different polygons, each with different roles associated: so you’d (optionally) have the main central body, then a thin rectangle for feet, and two thin rectangles for sides, and another for head or some similar combination. Sometimes they are tapered to avoid getting caught into obstacles. They can have different physics properties, and collision callbacks on those can be used to determine the status of character. For more information, sensors (non-colliding objects that are just used to check for overlap) can be used. Common cases include determinining whether we’re close enough to the floor to perform a jump, or if the character is pushing against a wall, etc.
General Considerations
Regardless of the type of platform movement that you have chosen (except perhaps for type #1), a few general considerations apply.
Acceleration
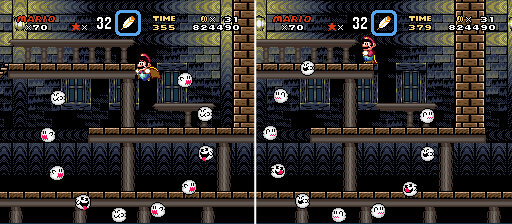
 Super Mario World (low acceleration), Super Metroid (mid acceleration), Mega Man 7 (high acceleration)
One of the factors that affects the feel of a platformer the most is the acceleration of the character. Acceleration is the rate of change in speed. When it is low, the character takes a long time to reach its maximum velocity, or to come to a halt after the player lets go of controls. This makes the character feel “slippery”, and can be hard to master. This movement is most commonly associated with the Super Mario series of games. When the acceleration is high, the character takes very little (or no time) to go from zero to maximum speed and back, resulting in very fast responding, “twitchy” controls, as seen in the Mega Man series (I believe that Mega Man actually employs infinite acceleration, that is, you’re either stopped or on full speed).
Even if a game has no acceleration on its horizontal movement, it is likely to have at least some for the jump arcs – otherwise they will be shaped like triangles.
How it works
Implementing acceleration is actually fairly simple, but there are a few traps to watch out for.
- Determine xTargetSpeed. This should be 0 if the player is not touching the controls, -maxSpeed if pressing left or +maxSpeed if pressing right.
- Determine yTargetSpeed. This should be 0 if the player is standing on a platform, +terminalSpeed otherwise.
- For each axis, accelerate the current speed towards target speed using either weighted averaging or adding acceleration.
- Weighted averaging: acceleration is a number (“a”) from 0 (no change) to 1 (instant acceleration). Use that value to linearly interpolate between target and current speed, and set the result as current speed.
vector2f curSpeed = a * targetSpeed + (1-a) * curSpeed;
if (fabs(curSpeed.x) < threshold) curSpeed.x = 0;
if (fabs(curSpeed.y) < threshold) curSpeed.y = 0;
- Adding acceleration: We’ll determine which direction to add the acceleration to (using the sign function, which returns 1 for numbers >0 and -1 for <0), then check if we overshot.
vector2f direction = vector2f(sign(targetSpeed.x - curSpeed.x),
                              sign(targetSpeed.y - curSpeed.y));
curSpeed += acceleration * direction;
if (sign(targetSpeed.x - curSpeed.x) != direction.x)
    curSpeed.x = targetSpeed.x;
if (sign(targetSpeed.y - curSpeed.y) != direction.y)
    curSpeed.y = targetSpeed.y;
Jump control
 Super Metroid, Samus performing the “Space Jump” (with “Screw Attack” power-up)
Jumping in a platform game can be as simple as checking if the player is on the ground (or, often, whether he was on the ground anytime on the last n frames), and, if so, giving the character an initial negative y speed (in physical terms, an impulse) and letting gravity do the rest.
There are four general ways in which the player can control the jump:
- Impulse: seen in games such as Super Mario World and Sonic the Hedgehog, the jump preserves the momentum (that is, in implementation terms, the speed) that the character had before the jump. In some games, this is the only way to influence the arc of the jump – just like in real life. There is nothing to implement here – it will be like this unless you do something to stop it!
- Aerial acceleration: that is, retaining control of horizontal movement while in mid-air. Though this is physically implausible, it is a very popular feature, as it makes the character much more controllable. Almost every platformer game has it, with exceptions for games similar to Prince of Persia. Generally, the airborne acceleration is greatly reduced, so impulse is important, but some games (like Mega Man) give you full air control. This is generally implemented as merely tweaking the acceleration parameter while you’re airborne.
- Ascent control: another physically implausible action, but very popular, as it gives you much greater control over the character. The longer you hold the jump button, the higher the character jumps. Typically, this is implemented by continuing to add impulse to the character (though this impulse can incrementally decrease) for as long as the button is held, or alternatively by suppressing gravity while the button is held. A time limit is imposed, unless you want the character to be able to jump infinitely.
- Multiple jumps: once airborne, some games allow the player to jump again, perhaps for an unlimited number of times (as in the Space Jump in Super Metroid or the flight in Talbot’s Odyssey), or for a limited number of jumps before touching the ground (“double jump” being the most common choice). This can be accomplished by keeping a counter that increases for each jump and decreases when you’re on the ground (be careful when you update this, or you might reset it right after the first jump), and only allowing further jumps if the counter is low enough. Sometimes, the second jump is shorter than the initial one. Other restrictions may apply – the Space Jump only triggers if you’re already doing a spin jump and just began to fall.
Animations and leading
 Black Thorne, character doing a long animation before shooting backwards (Y button)
In many games, your character will play an animation before actually performing the action you requested. However, on a twitchy action-based game, this will frustrate players – DON’T DO THAT! You should still have leading animations for things such as jumping and running, but if you care about how the game responds, make those cosmetic only, with the action taken immediately regardless of the animation.
Smoother movement
Using integers to represent the position of the characters is wise, as it makes it faster and stable. However, if you use integers for everything, you will end up with some jerky motion. There are multiple solutions to this. These are a few:
- Use a float for all computations and for storing position, and cast to int whenever you’re rendering or computing collisions. Fast and simple, but it starts losing precision if you move too far away from (0,0). This is probably not relevant unless you have a very large playfield, but it’s something to keep in mind. If it comes to it, you can use a double instead.
- Use a fixed point number for all computations and position, and again cast to int when you’re rendering or computing collisions. Less precise than float and with a more limited range, but the precision is uniform and can, on some hardware, be faster (notably, floating point processing is slow on many mobile phones).
- Store position as an integer, but keep a “remainder” stored in a float. When integrating position, compute the delta-movement as a float, add the remainder to the delta-movement, then add the integer part of this value to the position, and the fractional part to the “remainder” field. On the next frame, the remainder will get added back in. The advantage of this method is that you’re using an integer everywhere except for movement, ensuring that you won’t have floating point complications elsewhere, and increasing performance. This technique is also very suitable if you have some framework in which the position of the object has to be an integer, or where it is a float, but that same position is used directly by the rendering system – in that case, you can use the framework-provided float position to store integer values only, to make sure that the rendering is always aligned to pixels.




Vinicius
/ 2012-05-20Regarding your last paragraph it is easier to keep the position as a float, and use the rounded integer for the drawing and colision.(Unless you are in the vectorial case.)
Bruno
/ 2012-05-20About sonic, check those links: http://info.sonicretro.org/Sonic_Physics_Guide
Richard Davey
/ 2012-05-20Really nice and comprehensive article, great stuff!
DfKimera
/ 2012-05-20This was, by far, the most comprehensive and best explained article on character movement. Thanks a lot! I’m saving this for future reference
Lea Hayes
/ 2012-05-21Fantastic read!
One way to fake those loops in Sonic might be to switch from tile representation to a purely circular representation. The user can still choose to jump, but movement would be constrained to circle until either a) sonic exits loop or b) sonic jumps.
This approach might even make it easier for sonic to resist the steep climb (until he has enough force).
@Bruno Cheers for the link, I will have a read!
MichaelJW
/ 2012-05-21This is absolutely fantastic – what a great resource and reference! Thanks so much for putting it together.
Philip Bjorge
/ 2012-05-21Awesome resource! I’ve wanted to read something like this ever since I started programming.
Thanks for the hard work in compiling all this!
Noble Kale
/ 2012-05-22Some reasonable points here – a few of which are already in Arnthak. Ladders definitely do seem more complex, till you realise how they should *really* work.
Mr Speaker
/ 2012-05-22This is an excellent article – and even though it’s pretty long, I was hoping it would keep going!
Kuato
/ 2012-05-22Great article. Thank you for such a great resource.
diegoserranoa
/ 2012-05-23Oh this would’ve made my life easier years ago. It is a great article.
Ric Lumb (@cartoonsbyRic)
/ 2012-05-23Great article! 😀
Jose Antonio Andujar (@jandujar2)
/ 2012-05-23Thank’s for your info.
Ehud
/ 2012-05-23Awesome post. Thanks
Dwedit
/ 2012-05-23Near the beginning of the article, you mentioned that “games used 1px resolution, aligned to integers”. But this is not correct. Even games like Super Mario Bros on the NES used fractional pixel coordinates.
Dominic
/ 2012-05-24Great article man. Really impressive stuff. Subscribed to blog!
Benjamin Meyer
/ 2012-05-24Something that can added to the “Tile-based” section is how old console graphics hardware were all tile based so it was more than a good idea, it was pretty much the only way to do it back then.
Karl Keefer
/ 2012-05-24I didn’t know how badly I wanted to read an article like this until I just read this one. Time to go make a sweet platform game!
Thanks for your work putting this together.
-Karl
Johnny
/ 2012-05-24Great article.. How about something on game loops and more general so that we know how to start exactly? Also on what tools and programming languages are currently the best for doing these kind of games?
sami
/ 2012-05-24wonderfully explained – thanks – saving for posterity!
Kevin Reid
/ 2012-05-24A small nitpick: In Toki Tori, the character is 2×2 tiles. Most level features are also 2×2 in size so it can seem like the larger scale, but it can be seen that: the character can take a step half their own width and can place bridges at that resolution, and features can be offset by one tile (there are lots of places where you could teleport where you want if only something was half-your-width closer).
Fred
/ 2012-05-24I’m all for the vectorial approach but using line segments for the ground and using a bounding circle for the player. Collision detection then is quite easy using the dot-product projection approach.
hendi
/ 2012-05-24Wow, thanks a lot for this great post! It was a pretty interesting read and even though this post is quite long I wish I’d be much longer. I love the way you highlight all the details and the tile grids in all images, I can only imagine how long this post has taken you to write. Big kudos to you!
Nubit
/ 2012-05-24Awesome article really
It’s very comprehensive and a great help for newbie 2D game developers.
YopSolo
/ 2012-05-24thx a lot for this post
It took me ~3 hours to create this :
http://www.yopsolo.fr/wp/2012/05/25/platformer-type-2-tile-based-smooth/
controls :
click to give focus
right/left arrow to move and A Key to sky-jump :p
This test is based on the method : Type #2: Tile Based (Smooth)
I like the result and i may continue to work on it ^^
Michael
/ 2012-05-24Man, I wish I had seen this when I first started looking at game programming. Great article!
Surya
/ 2012-05-25Great article man. Really great.
Halley
/ 2012-05-25This is an excellent article, good work!
Aditya
/ 2012-05-26I am definitely saving this for future reference. Great article! Thumbs up!
Kavin
/ 2012-05-26vector2f curSpeed = a * targetSpeed + (1-a) * targetSpeed;
when you do it like this, curSpeed is always targetSpeed:
a*x + (1-a)*x = a*x + x – a*x = x
the second targetSpeed should be the curSpeed?
amz
/ 2012-05-26Thank you all for the feedback!
I’ve made a few changes to the article to reflect those.
iNSERT.CODE
/ 2012-05-26Awesome article for Indies thanks. Bookmarked for future reference.
Felipe Budinich
/ 2012-05-26I just realised that I’ve never, not even once, I have implemented the Type 1 platformer correctly.
Great read, thanks 😉
Ozy
/ 2012-05-27Just a quick note on Limbo: I know for a fact that it’s actually made in a 3D engine, making it very different from the standard vector engine. I don’t remember their reasoning behind doing this (it might have simply been that the programmers making it had more experience doing 3D than 2D), but the physics and logics engine was amazing and had tons of implementations that made it very easy to test out new levels. Only drawback was that it was intricately tied to the boy character and without him it wouldn’t work at all (I’m guessing he had some kind of complicated polygon collision system).
Great article though, thanks for that.
Juan Pablo.
/ 2012-05-27Thanks for the doc!.
Raqsonu
/ 2012-05-28Olá senhor! Gostaria de saber como é a mecânica de um jogo 2D, mas que o personagem é capaz de se mover para cima e para baixo no chão. Como golden axe, legend of mana, etc.
Grato e ótima matéria, sou ilustrador e não programador, mas sinto vontade de saber disso.
Stefan Forsberg
/ 2012-05-28Thanks a lot for this post, really appreciate all the work that went into it!
Soma
/ 2012-05-29I’d like to see a similar article on pinball games
Gabor Szauer
/ 2012-05-29An old, but complete and up to date article series about the second method and it’s special cases: http://www.tonypa.pri.ee/tbw/start.html
Miro
/ 2012-05-30Hi, great article as it describes many many things of the platformers. I have developed 2d platformer myself so this article reminds me of those sweet days. Good thing that you have put illustrational images to the article.
Coglia
/ 2012-05-31Thanks for the article, very useful and interesting!
amz
/ 2012-05-31Fixed and tweaked a few more things, especially regarding slopes.
Adrian
/ 2012-05-31I can’t speak for Talbot’s Odyssey but the way Worms works is not as complicated as it seems.
Except campaign mode where some things may be scripted and you want an exact layouts, levels are randomly generated based on specific curves.
The rendering of the terrain and terrain destruction are not extremely complicated either. Basically you can store if a certain pixel is air/terrain on one bit. For a quite large level, say 6000 x 4000 (more than 3 full HD screens), you’re gonna need (6000 * 4000) / 8 bytes of memory for the collision map. So around 3MB. What gets drawn can be split into air tiles (draw nothing, just let the background show), full tiles (full rectangular predefined image of the terrain’s pattern) and destroyed / curved tiles.
Obviously worst case scenario is your level gets messed up in such a way that you have to keep and draw everything as destroyed tiles. That’s gonna need an addition (6000 * 4000) * your BPP of choice. Even at 16BPP (RGB565 let’s say), you’d need 366MB of memory if you want to draw each frame fast. So for this huge level, it gets tricky and you have to start thinking about ways to optimise However I think that levels were much smaller than this.
As for the worm and terrain collision, I can say it works fine like in the first mega man picture.
(worked on a worms game)
Mario
/ 2012-06-07For years I have wondered, thanks for the explanation!
Marcus
/ 2012-06-07Awesome article! A good read for someone like me who wants to understand the tech behind games a bit better.
Thanks!
Braunbaer
/ 2012-06-08I would love to see a similar article about isometric games! (like Baldurs Gate)
江新雨
/ 2012-06-13很ä¸é”™çš„æ–‡ç« ï¼Œä¸çŸ¥é“汉å—能ä¸å‘¢ä¸ªæ˜¾ç¤ºã€‚
Assaji Tjahjadi
/ 2012-08-04Thanks for your explanation.. It’s a great article.
ElvishJumpSuit
/ 2012-08-18What an excellent article!
What we found when developing our game is that it becomes difficult when the logic of different behavoiurs start to interact in unexpected ways. I’m starting to seriously consider the ‘Physics Engine’ route but I know that it can be quite processor intensive.
There is so much useful information in your article that I’m going to read the whole thing again right now.
Thanks!
online games
/ 2012-08-29You’re so awesome! I do not suppose I’ve read through a single thing like this before.
So good to discover someone with a few genuine thoughts on this subject.
Seriously.. many thanks for starting this up.
This web site is one thing that is required on the web, someone with some originality!